

Table of Contents
- Why Diecast Box Condition Matters to Collectors
- What You Need to Protect Diecast Boxes: Best Shipping Materials for Diecast Models
- Step-by-Step: How to Protect Diecast Boxes During Shipping
- Double Boxing Diecast Cars: The Box-Within-a-Box Method
- How to Prevent Box Crushing During Shipping: Void Fill and Cushioning
- Common Mistakes That Lead to Transit Damage
- Insurance, Labeling, and Final Checklist Before Dispatch
- Final Thoughts on Protecting Diecast Packaging
- Frequently Asked Questions
Last Updated: September 8, 2026
For serious diecast collectors, the value of a model often rests as much on the box as the car inside. Knowing how to protect diecast boxes during shipping is the difference between preserving that value and watching it disappear in transit. Childrenstoycloset.com is committed to providing high-quality, factory-sealed products to ensure our customers receive the best possible items for their collections.
Shipping carriers do not treat your parcel with care. Packages are stacked, dropped, and compressed. Without a deliberate strategy, even a short journey can result in crushed corners or a destroyed box. Below, we'll show you how to build a protective system that survives the journey.
Why Diecast Box Condition Matters to Collectors
The box is part of the product. For many hobbyists, a model is only "mint" if the cardboard is crisp, the decals are unblemished, and the factory seal remains intact. A creased corner or crushed edge can cut a collectible's market value dramatically.
This is especially true for limited runs and older series. A rare 1/64 scale release in flawless packaging is a different asset than the same car in a damaged box. Protecting the packaging is protecting your investment.
What You Need to Protect Diecast Boxes: Best Shipping Materials for Diecast Models
Before you tape a single seam, gather the right supplies. Skimping on these basics is the first mistake that leads to transit damage.
Essential Supplies Checklist
- Acid-free tissue paper: Acts as a soft, non-reactive first layer that prevents scuffs without the risk of chemical transfer.
- Bubble wrap: Provides the primary cushioning and impact resistance. Choose a roll with medium or large bubbles for better shock absorption.
- Corrugated box (outer): Must be rigid and clean. A crushed or weak outer box negates all your inner work.
- Void fill (packing peanuts or crumpled paper): Fills empty space to stop internal movement.
- Packing tape: For sealing the outer box. Use reinforced tape for heavy items.
- Masking tape: For securing the inner wrap without leaving residue on the collectible packaging.
- Fragile shipping label: Alerts handlers to take extra care, though it is not a substitute for proper cushioning.
Step-by-Step: How to Protect Diecast Boxes During Shipping
The process is straightforward, but each layer serves a specific purpose. Rushing through the steps compromises the entire structure.
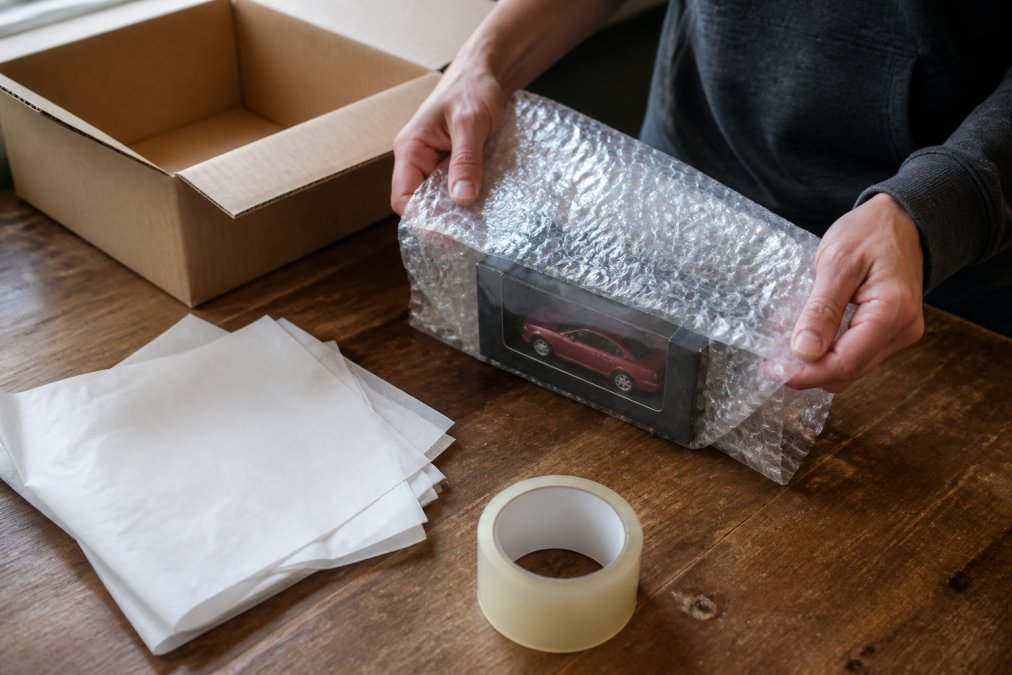
Step 1: Wrap the Box in Acid-Free Tissue Paper
Wrap the diecast box in a single layer of acid-free tissue paper. This isn't for cushioning; it protects the glossy surface from micro-scratches. Fold the paper tightly and secure it with masking tape on the underside, never on the face of the packaging.
Step 2: Add a Bubble Wrap Layer for Impact Resistance
Wrap the tissue-covered box in 2-3 layers of bubble wrap. The bubbles absorb shock and distribute pressure across the surface. Ensure the wrap is snug but not so tight that it flexes the cardboard. Secure with masking tape at the seams.
Step 3: Seal and Reinforce the Corners
The corners are a diecast box's most vulnerable points. After the bubble wrap is secured, tape small squares of cardboard or rigid foam corner protectors over the four corners. This "bumper" absorbs the brunt of any impact, keeping the cardboard beneath from crushing.
Double Boxing Diecast Cars: The Box-Within-a-Box Method
The single most effective technique for high-value items is the box-within-a-box method, which creates a buffer zone so any force on the outer parcel never reaches the collectible.
Start with a sturdy corrugated box significantly larger than your wrapped model. Place the model in the center and surround it completely with void fill, aiming for at least 2-3 inches of cushioning on all sides. This gap absorbs shock and prevents the inner box from touching the outer walls.
How to Prevent Box Crushing During Shipping: Void Fill and Cushioning
Even with a great inner wrap, a box can be crushed if there is empty space inside the outer parcel. When a package shifts during transit, it gains momentum, and that force transfers directly to your model.
Choosing the Right Outer Box Size
Select an outer box that gives room for cushioning without being excessively large. A box too big may collapse under weight; a box too small offers no protection. Choose a box where your wrapped model fits with at least two inches of clearance on every side.
Testing Your Packing Method
Before sealing the parcel, give it a gentle shake. If you feel or hear movement, add more void fill. A properly packed box should feel like a solid unit. This quick check can save you from a costly claim later.
Common Mistakes That Lead to Transit Damage
Most damaged shipments result from a few predictable errors. Beyond flimsy boxes, insufficient void fill, and tape on the packaging, there's a category almost no one talks about: environmental exposure. Heat, cold, and humidity can silently ruin a diecast box even when the physical packing is flawless.
The Usual Suspects: Physical Packing Errors
- Using a flimsy outer box: Reusing a worn or weak box offers no structural integrity. The outer box is your first line of defense; it must be rigid. A single-wall corrugated box might be fine for a t-shirt, but for a diecast model, choose a double-wall box with a bursting strength of at least 200 pounds per square inch (psi). If you can easily flex the box with one hand, it's not strong enough.
- Insufficient void fill: Leaving even a small gap allows the package to shift and gain momentum, leading to impact damage. The standard is 2-3 inches of cushioning on every side. If you're using packing peanuts, fill the box until the model is firmly held in place, when you close the lid, the contents should not move at all.
- Wrapping directly in tape: Never apply tape directly to the diecast box. It can tear the cardboard or leave sticky residue that ruins the packaging. Use masking tape or painter's tape on the inner wrap, and reserve packing tape for the outer box only.
- Forgetting corner protection: Corners are the weakest point of any box. Without reinforcement, they are the most likely area to crush. Cardboard corner protectors or rigid foam squares taped over the corners of the wrapped model can absorb the brunt of an impact.
- Oversizing the outer box: A box that's too large is almost as bad as one that's too small. It requires excessive void fill, which adds weight and cost, and it increases the chance of the box collapsing under the weight of other parcels. Match the outer box to the size of your wrapped model with just enough clearance for cushioning.
The Hidden Killer: Humidity and Temperature
A scenario that surprises many collectors: the outer box arrives with no dents, yet the box inside is warped, the decals are bubbled, or the cardboard feels damp. The parcel sat in a hot truck or cold warehouse, and the environment did the damage.
Cardboard is hygroscopic, it absorbs moisture from the air (peer-reviewed research). High humidity can soften, warp, or mold the box; temperature drops can cause condensation that ripples the cardboard or peels decals. For factory-sealed models, the plastic window can fog or warp, and paint can react to extreme heat.
How to Test Your Packing Before You Ship
The Takeaway
Physical packing errors are easy to spot and fix; environmental damage is invisible until it's too late. By combining rigid outer boxes, proper void fill, and moisture control, you can protect your diecast boxes from both threats.
Insurance, Labeling, and Final Checklist Before Dispatch
Most packing guides stop at the physical layer. But the financial side of shipping is just as critical. A $200 limited-edition 1/64 model or a $1,500 1/18 resin piece can be lost or crushed despite your best efforts. Without documentation and the right insurance, you absorb that loss yourself.
Document Everything Before You Seal the Box
Take a video and photos showing the model's condition from every angle, including close-ups of the factory seal, decals, and any imperfections. Then photograph the packing process: the wrapped model, corner protectors, void fill, and sealed outer box with the tracking label visible. This creates a timestamped chain of custody that carriers and payment platforms will ask for if a claim is filed.
Declare the True Value and Choose the Right Coverage
Never rely on default coverage for high-value items. Most carriers cap basic liability at $100 or less (usps.com). Declare the full replacement value when you purchase the label, typically $1-$5 per $100 of coverage, the only way to recover actual market value if the parcel is damaged or lost.
Declare the model's current market value, not what you originally paid. For out-of-production pieces, check recent sold listings on eBay or collector forums. For factory-sealed pieces, note that box condition is part of the value, a crushed corner can reduce worth by 30-50%, so declare the item in mint condition.
The Claims Process: What to Do If Damage Occurs
If the parcel arrives damaged, do not accept it without inspection. Have the recipient photograph the outer box before opening, then the inner packaging and model as it's unpacked. File the claim within the required window, usually 24-48 hours for visible damage or up to 60 days for concealed damage (fedex.com). Keep all packaging; the carrier may request to inspect it.
Labeling: What Works and What Doesn't
Apply "FRAGILE" labels to at least two adjacent sides of the outer box. While automated sorting machines don't read them, human handlers are more likely to place the parcel on top of a stack. This is not a substitute for proper cushioning, but it's a low-cost signal that can influence handling.
Final Pre-Dispatch Checklist
Before you hand the parcel over, run through this list:
- Model wrapped in acid-free tissue paper
- 2-3 layers of bubble wrap applied snugly
- Corner protectors taped over all four corners
- Outer box is rigid and clean, with no prior crush damage
- 2-3 inches of void fill on all sides, including top and bottom
- No internal movement when gently shaken
- "FRAGILE" labels on at least two sides
- Photos and video of the model and packing process saved
- Shipping insurance purchased for the full declared value
- Tracking number recorded and shared with the recipient
This checklist takes five minutes but turns a hopeful shipment into a protected transaction. The difference between a smooth delivery and a costly dispute is often just this documentation.
Final Thoughts on Protecting Diecast Packaging
Protecting your diecast packaging is a simple process of layering defenses: soft wrap, impact cushioning, corner reinforcement, and a rigid outer shell with void fill. It takes a few extra minutes and a small investment in materials, but the payoff is a collectible that arrives in pristine condition.
We know that condition is everything. Childrenstoycloset.com is committed to providing high-quality, factory-sealed products to ensure your models arrive ready for the shelf or the vault. When you are ready to add to your collection, browse our selection of Hot Wheels, Greenlight, and Auto World models, and buy with confidence knowing your investment is protected.
Frequently Asked Questions
What is the best way to pack diecast cars to prevent box crushing?
The most reliable method is double boxing. Wrap the diecast box in acid-free tissue paper, then a layer of bubble wrap. Place it in an inner box with at least 5 cm of cushioning on all sides. Put that inner box inside a larger corrugated outer box and fill the gap with packing peanuts or crumpled paper. This box-within-a-box structure absorbs impacts and prevents crushing during transit.
Should I use bubble wrap or packing paper for diecast boxes?
Use both for different purposes. Acid-free tissue paper goes directly against the diecast box to prevent scuffs without reacting with the cardboard. Bubble wrap provides shock absorption and impact resistance on top of that. Packing paper or peanuts are best as void fill in the outer box. Avoid newspaper, as ink can transfer onto the packaging.
How do I protect the corners of diecast boxes during transit?
Corners are the most vulnerable part of any diecast box. After wrapping the box, add extra strips of bubble wrap or cardboard corner protectors over each corner. Secure them with masking tape rather than standard packing tape, which can leave residue. When placing the box in the shipping container, ensure corners have at least 5 cm of void fill between them and the outer box walls.
Is double-boxing necessary for shipping high-value diecast models?
For rare or factory-sealed collectibles, yes. Single-layer packaging often cannot withstand the stacking and handling parcels receive in transit. Double boxing creates a cushioning gap that absorbs impacts before they reach the product box. If you are shipping a model worth more than the shipping cost, the extra box and void fill materials are a small price for protecting your investment. When in doubt, double box.